Recipes
22 November 2010

Cooked hams are improved by very slowly heating them in the oven and glazing with juice, sugar and spice to give extra sweetness. Choose a ham on the bone, or for really easy carving a ‘champagne’ ham with almost all the bones removed which is far chunkier and rounder than the traditional ham.
- 1 whole cooked ham on the bone (6kg to 9kg)
For the glaze:
* 1 cup brown sugar
* 1 tablespoon cardamom
* 1 tablespoon Dijon mustard
* 1 1/2 cups fresh orange juice
For the garnish:
* Sugar syrup made with 2 cups water and 1 cup granulated sugar
* 3 oranges
* 3 tablespoons cloves
Carefully cut around the skin at the shank end of the ham, leaving about 6cm on the bone. Remove the skin from the ham by sliding your fingers under the skin to loosen it, leaving a good coating of fat on the ham.
With a sharp knife score the surface of the fat into small even diamonds. Place the ham in a large baking dish and pour over one cup of the orange juice.
Put the ham in an oven pre-heated to 160°C and cook for about 15 minutes per kilogram. (Hams are generally between 6kg and 9kg.)
About 15 minutes before the total cooking time, remove the ham from the oven and turn the heat up to 200°C. Mix the sugar, cardamom and mustard together with the remaining orange juice and spread this over the ham. Place in the oven and cook for the final 10-15 minutes so the skin is nicely glazed. Remove and decorate with the oranges and cloves.
To make the orange garnish, bring the sugar and water to a simmer, making absolutely certain all the sugar is dissolved before the syrup boils. Allow the syrup to boil for 20 minutes to reduce and thicken. Cut the oranges into thin slices with the skin on, and drop them carefully into the syrup. Poach for 5 minutes and leave in the syrup to cool.
The ham can be done well ahead, but keep refrigerated until serving and it will last for ten days at least when wrapped in a damp ham cloth.
Recipe by Lauraine Jacobs fro Christmas
Print • ∞ Permalink • Comments
9 November 2010
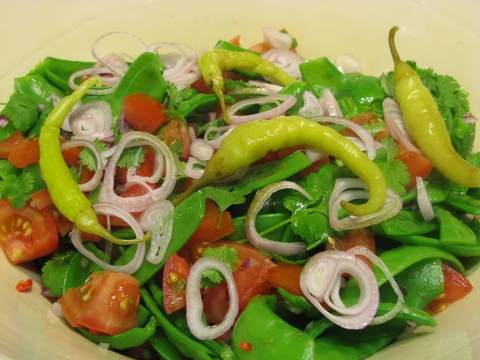
A lovely Spanish inspired salad that use guindillas, small green pickled peppers from Spain and available at Sabato. Serves 6 as a salad.
- 500g snow peas
- 3 tablespoons finely chopped white onion
- 2 cups diced tomato
- 4 tablespoons roughly chopped fresh coriander
- 1 teaspoon finely chopped fresh oregano
- 6 tablespoons lime juice
- 4 tablespoons Spanish olive oil
- 1-2 fresh red chillies, deseeded and finely sliced
For the topping:
- 3 tablespoons chopped fresh coriander
- ½ cup freshly sliced shallots
- Guindillas in brine, left whole,
To prepare the snow peas, snap off the stem and remove the string from each side of the pods. Blanch quickly in rapidly boiling salted water for about 90 seconds (until they turn bright green), then drain and refresh under cold water. Place on kitchen paper and pat dry.
Toss together the snow peas, onion, tomato, coriander, oregano, lime juice, oil and chilli. Set aside to marinate (out of the refrigerator) for an hour before serving.
To serve, sprinkle over coriander, shallots and guindillas on top and serve cold.
Recipe from The New Zealand Vegetable Cookbook, as cooked at Nosh Cooking Class 9 Nov 2010
Print • ∞ Permalink • Comments
6 November 2010
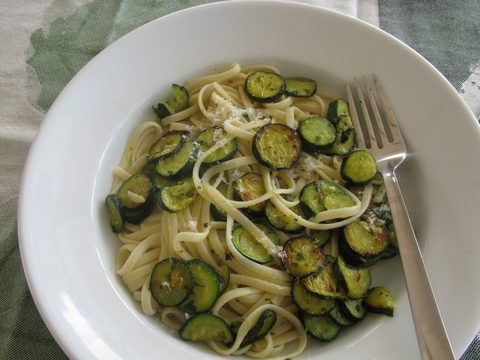
The lovely cook, Annunziata, in the Villa Nuvolari in Positano cooked a delightfully simple pasta dish for us one night on our recent trip. I have been waiting for the first zucchini of the summer to replicate this and today we bought some tiny vegetables from Quail Farm so here's our lunch.
- 100g linguine (Organic Rustichella d'Abruzzo from Sabato)
- 3 tablespoons extra virgin olive oil (Duck Creek from Matakana)
- 1/2 small onion finely chopped
- 6 small handpicked summer zucchini, sliced finely
- Several sprigs thyme, leaves only
- 1 lemon, zest only
- Salt , pepper and grated Parmigiano Reggiano
Bring lots of salted water to the boil, add the linguine and cook until tender.
Meanwhile heat the oil in a pan, and when hot add the onion. Saute until golden, then add the zucchini and saute over medium heat. Add the herbs and lemon zest and cook until the zucchini start to turn golden. Season to taste.
Drain the pasta and toss into the pan with the zucchini. Gently stir together to combine, divide between two plates and serve at once with grated Parmigiano Reggiano.
Print • ∞ Permalink • Comments
31 October 2010
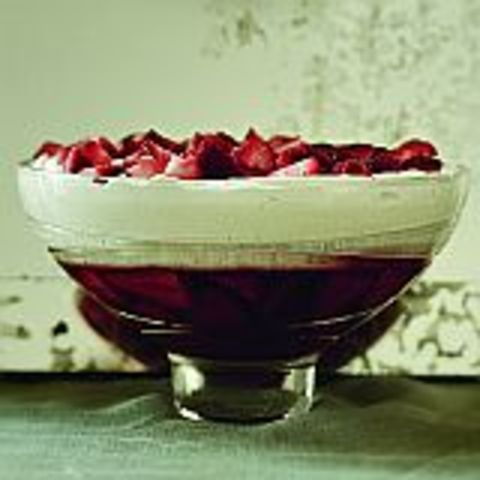
This recipe is inspired by the Spanish cream my mother and grandmother both made often as a dessert. Totally easy and totally delicious.
- 3 punnets ripe strawberries
- 1 packet strawberry jelly crystals
- 3 cups full cream milk
- 20g gelatine
- 1 vanilla pod
- 2 eggs separated
- 120g caster sugar
- Pinch of salt
- 4 tablespoons Drambuie
- 300mls cream
Take two of the punnets of strawberries, remove the stalks, cutting each strawberry in half lengthwise. Lay the strawberries in the bottom of a lovely glass bowl.
Dissolve the jelly crystals in 500mls boiling water, allow it to cool a little and pour the liquid over the strawberries. Place this in the refrigerator and leave overnight or for at least two hours to set.
To make the Spanish cream, soak the gelatine in 1 cup of the milk.
Put the remaining 2 cups milk into a saucepan, split the vanilla pod and bring to the boil.
Meanwhile beat 2 egg yolks with the sugar to a cream with a whisk, adding a pinch of salt.
Add the hot milk to the yolk mixture. Return to the saucepan adding the gelatine and milk and stir well over the heat until the mixture thickens. Do not allow to boil as the mixture will curdle.
Whisk 2 egg whites stiffly in a separate bowl. Fold the egg whites with the Drambuie into the milk mixture while still warm.
Allow this to become almost cool but still not setting, before pouring the Spanish cream on top of the strawberry jelly.
Place in the refrigerator overnight to set.
To serve, softly whip the cream and spread this over the Spanish cream. Chop the remaining punnet of strawberries into small pieces and scatter over the cream. Serves 10-12.
An original recipe by Lauraine Jacobs
Print • ∞ Permalink • Comments
19 October 2010

Asparagus and three cheese tart
Asparagus combines beautifully with cheese. Serve this tart with a crisp pastry crust filled with asparagus tips, ricotta, parmesan and feta for a lovely luncheon idea. Perfect served with a crisp Sauvignon Blanc
Serves 6-8 as a main course with a green salad
For the pastry case:
- 200g flour
- 130g butter, ice cold and cut into dice
- 25 g Parmesan, very finely grated
- 3 tablespoons ice cold water :
For the filling
- 350g asparagus spears, cut into 3-4 cm lengths
- 200g fresh white cheese such as labne, or ricotta
- 4 eggs
- Grating of nutmeg
- Salt and freshly ground black pepper
- 25g Parmesan cheese freshly grated
- 150 g crumbly feta cheese
Preheat the oven to 180°C. To make the pastry, place the flour, butter and parmesan cheese in a food processor and pulse together until the mixture resembles fine crumbs. Pour in the ice cold water through the feed tube with the motor running until the crumbs moisten and start to draw together (this will only take a few seconds). Turn the pastry out onto a clean bench and knead it to ensure it is smooth. Roll out in a circle to fit a 24cm loose-bottomed flan tin. Trim the edges neatly. Crush a large piece of baking paper to make it soft so it can be pushed right into the corners, and then spread it out to fill the pastry case. Fill with baking beans and bake blind for 15 minutes until the pastry is a very light sand colour. Remove and cool slightly.
To make the filling, blanch the asparagus in simmering salted water for 2-3 minutes, and immediately plunge into ice cold water to retain the fresh green colour.
In a bowl beat the labne or ricotta with the eggs, nutmeg, salt and black pepper until smooth.
Grate the Parmesan over the base of the baked pastry case. Crumble half the feta over this, then pour on the ricotta and egg mixture. Lay the asparagus pieces on top of this mixture, and finally top with the remaining feta.
Return the pie to the heated oven and bake for 30 minutes, until the mixture starts to turn golden. Allow to stand a few minutes before serving with a fresh green salad.
Print • ∞ Permalink • Comments
1 August 2010
Here are the recipes I cooked at the Food Show. My Luxurious Salmon Tart follows and is pictured below.
Glazed Venison medallions with shaved fennel, radish and pasta salad dressed with mint and pink peppercorns
The salad in this recipe appears in “The New Zealand Vegetable Cook Book” which is due for release this week.
- 4-6 Silver Fern Farms venison medallions
- Salt, pepper and freshly picked thyme leaves
- 2 tablespoons Village Press extra virgin olive oil
- 1 tablespoon butter
- 250mls Essential Cuisine Classic Beef Jus
- 1 cup of freshly picked mint leaves
- 2 tablespoons Mustardmakers Dijon-style mustard
8 8 tablespoons Village Press extra virgin olive oil
- Salt and freshly ground black pepper
- 1 cup Montebello small farfalle pasta shapes ( little bows or similar, from Sabato )
- 2 med-large fennel bulbs
- 6 radishes
- 1 large avocado, chopped into chunks
- 2 teaspoons pink peppercorns
- 2 limes, juice and zest
Pre-heat the oven to 200°C.
Season the venison medallions with salt and pepper and the thyme leaves. Heat a frying pan and when hot add the oil and butter and allow to heat for 30 seconds. Add the venison medallions and sear quickly to brown on both sides. Remove and place in a small oven dish. Roast for 4-5 minutes immediately before serving.
Deglaze the frying pan with the beef jus while the venison is roasting and simmer for 2-3 minutes.
Meanwhile, to make the salad, place the pasta shapes in a large pan of well salted water and simmer until tender, but still al dente. Drain well and toss with 2 tablespoons olive oil so the pasta does not stick together. Allow to cool.
Slice the fennel and radishes with a mandolin so they are paper thin. Pick the remaining mint leaves from their stalks and place in a serving bowl with the sliced radish and fennel, the avocado and the cooked pasta. Make a dressing by mixing the pink peppercorns, lime juice and zest, the remaining olive oil, and salt and pepper and toss this over the salad, folding carefully.
To serve, remove the venison from the oven and place on a warmed but not heated plate. Pour the jus over each medallion and add a generous serving of the salad.
Recipe by Lauraine Jacobs
Fresh pears and persimmons with vanilla syrup and ice cream
No apologies for the most simple of desserts; high quality ingredients and a totally refreshing end to any meal.
- 3 ripe persimmons
- 2 large ripe pears
- 4 tablespoons Heilala Vanilla Syrup
- ½ litre Omaha Organic Berries vanilla ice cream (or their new Hokey Pokey)
8 Extra vanilla syrup to drizzle
Peel and core the persimmons and pears. Slice thinly and place in a large bowl and toss the syrup through to coat all the fruit.
When ready to serve, divide the pears and persimmons between 6 glass dessert dishes. Place a generous scoop of ice cream on the fruit, and drizzle over a little extra vanilla syrup.
Recipe by Lauraine Jacobs
Print • ∞ Permalink • Comments
25 July 2010
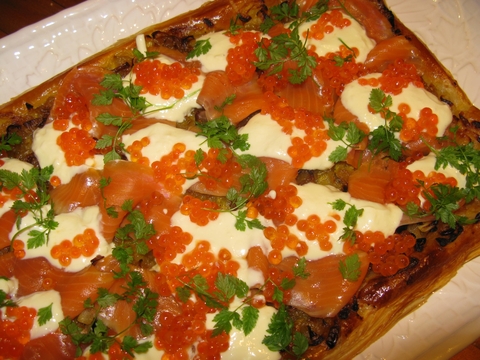
Pre-heat the oven to 200°C. Lay the pastry out to fit a 30cm x 40cm oven tray. Allow the pastry to rest in the refrigerator for at least 30 minutes if possible.
In a heavy frying pan, heat the olive oil and butter and add the onions. Cook slowly over a gentle heat, stirring frequently until they begin to caramelise.
Ladle the onions onto the pastry and spread out evenly, and scatter the seeds over. Place in the oven and raise the temperature by 10ºC. Bake for 15-20 minutes until the pastry is puffed and golden. Meanwhile, stir the horseradish into the crème fraiche and refrigerate until needed
Finally, cover the tart with the salmon, drizzle over the horseradish flavoured crème fraiche, and top with the salmon caviar and the herbs. Serve at once by cutting into serving portions. Can be served as an entrée, a luncheon dish or with drinks as an appetiser.
Recipe by Lauraine Jacobs
Print • ∞ Permalink • Comments
5 July 2010
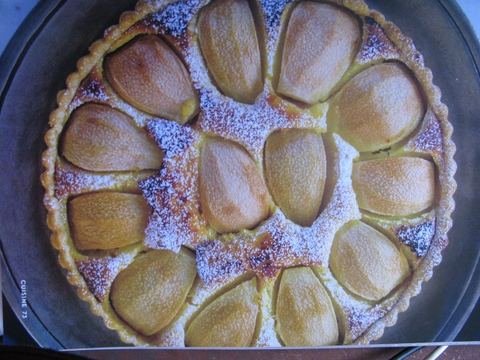
It’s the season for pears, so I love to make pear desserts. You can make the tart with the pastry in this recipe which will be well worth the effort, or you could use store bought pastry if you’re short of time. The almondy citrus flavoured filling is delicious. Serve with a lightly bubbly Moscato d’Asti which I always think seems to have an aroma of almonds.
- For the pastry:
- 180g butter, chilled and cut into tiny pieces
- 240g flour
- Pinch of salt
¼ cup water
For the filling:
- 4 medium pears, (Doyenne du Comice if you can get them) peeled and quartered and tossed in juice of 1 lemon
- 250g ground almonds
- 150g caster sugar
- 200g butter, at room temperature
- 3 eggs
- 100g plain flour
- Pinch of ground cinnamon
Make the pastry by placing the flour and butter in a food processor and pulsing together until the mixture resembles fine crumbs. Add the salt and a little of the water and pulse again so the crumbs start to join together and become a little ‘sticky.’ Tip the pastry out onto a clean board and draw it all together, lightly kneading it. Cover with glad wrap and refrigerate for at least 30 minutes.
To make the tart shell, roll the pastry out to fit the bottom and sides of a 25cm loose bottomed tart ring. Neatly and gently press the pastry into the corners and cut away any excess pastry that rolls over the edges. Allow this to chill for 10-15 minutes.
Pre-heat the oven to 180°C, placing a baking sheet in the oven to heat up. (This is so that the pastry will cook on the bottom when it is put into the oven.)
Make the filling by placing the almonds and sugar in the food processor to blend well. Add the butter in small lumps and process until the mixture is pale and smooth. Add the eggs one at a time and then add the flour and cinnamon and mix very briefly so the mixture comes together but is not over-processed.
Spread the filling over the base and then lay the pear quarters on top of this.
Place the tart on the heated baking sheet in the oven and bake for 15 minutes. Lower the heat to 160°C and continue baking for 35-40 minutes, until the pastry is golden and crisp and the filing has changed to a pale golden brown.
Take from the oven, dust the top with icing sugar and serve with whipped cream.
Serves 8.
Print • ∞ Permalink • Comments
5 July 2010
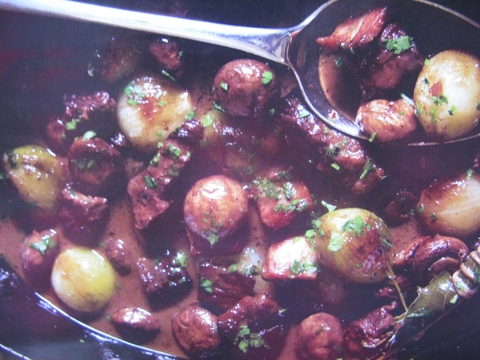
Absolutely perfect for the wintry weather. This Burgundy style beef dish was one of the most popular dishes I ever created at Cuisine. (The most famous of all is the Salad Rouge below.
I like to use gravy beef or blade steak as the long slow cooking makes the gelatinous meat very succulent. Do ensure you use a good red wine, freshly opened for cooking.
(You can always sip the other half of the bottle while you’re preparing the meal.)
The cooking time is long and slow…..perfect for winter cookery. Serve the Boeuf Bourgignon with a rice pilaf, mashed potato or baked whole potatoes in their jackets. Finish the meal with a tossed green leafy salad.
- 1.5kg stewing steak (blade steak or gravy beef), cut into 3cm cubes
- 3-4 tablespoons flour
- 2 tablespoons olive oil
- 60g butter
- 250g bacon, cut into thick lardons
- 3-4 medium shallots, finely chopped
- 2 cloves garlic, crushed to a paste with salt
- 1/2 bottle red Burgundy or Pinot Noir
- 375mls very good strong beef stock
- 1 tablespoon tomato paste
- 1 bouquet garni
- Salt and freshly ground black pepper
- 18 pickling onions, peeled
- 150g button mushrooms
- Parsley to garnish, finely chopped
Preheat the oven to 170°C
Dust the meat cubes with flour very lightly. Heat the oil and 1 tablespoon butter in a heavy based casserole dish (I use my faithful 24cm Le Creuset casserole) and add the lardons of bacon. Fry these until they are crisp, then remove and keep aside. Fry the meat in 2-3 batches until it reaches a rich nutty brown. Add the chopped shallots and garlic to the pan, fry for about two minutes, stirring constantly then return all the meat to the dish.
Add the wine, stock, tomato paste, bouquet garni, salt and pepper and bring to a simmer. Reduce the heat, cover the dish with the lid and place in the pre-heated oven so the dish can simmer very gently for about 1 ¾ hours. While the meat is cooking, peel and toss the pickling onions in butter in a small frying pan, to brown nicely. Add the bacon and pickling onions to the casserole, replace the lid and continue to simmer for a further 30 minutes. Finally, brown the mushrooms in a little more butter in the frying pan, and add for the final 10 minutes of cooking time.
Take the casserole dish from the oven, remove all the meat and garnishes to a large hot serving platter. Discard the bouquet garni. Boil the liquid down so the sauce becomes concentrated and thickens a little. Spoon the sauce over the meat, and garnish with finely chopped parsley. Serves 6.
Print • ∞ Permalink • Comments
27 June 2010
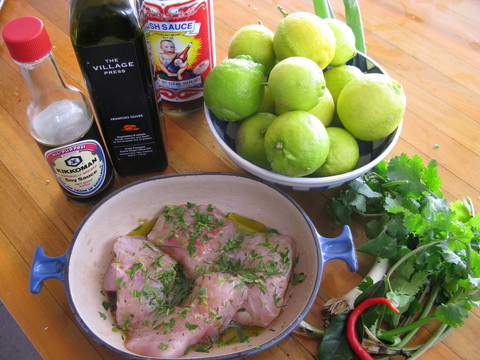
There's nothing quite like a fresh fish sandwich at lunch time. Here's a recipe for marinated fish that's slightly spicy with a wonderful zesty flavour redolent of the lime and coriander that are chopped freshly to give extra zing.
- 4 thick slices fresh hapuku or other firm white fish
- 2 tablespoons NZ olive oil
- 1-2 teaspoons Asian fish sauce
- 1 tablespoon soy sauce
- 1 kaffir lime leaf thinly shredded
- 4 tablespoons chopped coriander
- 1 lime, juice and zest
- 1 small chilli, seeds removed and finely chopped
- 1 spring onion, finely sliced
- freshly ground black pepper
- Warm bread rolls and cos lettuce leaves to serve
Mix all ingredients together and place ina shallow bowl. Put the fish in the marinade and turn well to coat. Allow to stand for at least 15 minutes.
Heat extra oil in a heavy frypan. When the oil is hot, gently fry the fish , turning once. The surface will turn golden and the fish should have a very moist interior.
Place the fish on cos lettuce leaves in four warmed fresh bread rolls. Add a dollop of mango chutney and serve at once.
Print • ∞ Permalink • Comments

